Guide 8 · Team and access: invite, choose roles, assign creators
Who sees what in your agency? You invite each person by e-mail, give them a role, assign their creators, and keep a record of what they do.
How to read this guide
The screens are the real MYMIK screens on the web, with a fictional agency (“Agence Lumière”), fictional creators (including Emma) and fans with made-up nicknames: no real data. The numbered black dot and the purple outline show where to click or look; the same number is used in the text.
Language of the screens
The MYMIK interface is not translated yet: the screens stay in French. For each step, the text gives the exact French label shown on screen, followed by its English meaning.
The order to remember
- In Agence › Employés (“Agency › Employees”), click Inviter un membre (“Invite a member”): e-mail, nickname, creators, role.
- To change a chatter’s creators later: Actions › Gérer les modèles assignés (“Manage assigned models”).
- To set rights page by page: Agence › Accès et rôles (“Access and roles”).
- To check: Agence › Activité (“Activity”), and « Se connecter en tant que » (“Sign in as”) to see what a member sees.
0. Before you start
What to know in one minute.
Who, where
- The owner (founder), HR and managers see Employés. Accès et rôles and Activité are reserved for the owner and HR.
- Everyone manages only the roles below their own: the owner adds HR, managers, external managers and chatters; HR adds managers, external managers and chatters; managers add external managers and chatters.
The roles in one line
- Propriétaire (owner): all rights. RH (HR): full HR management. Manager: creator management.
- Manager Ext. (external manager): creator access (external). Chatter: limited access, only to the creators assigned to them.
One account = one person
Never share an account between colleagues: Activité says “who did what, when, on which fan”, and an e-mail invitation is simpler and safer than a shared password.
1. Add a member
An e-mail invitation, or an account created directly.
1. Open Agence › Employés
In the left menu, open Agence, then Employés ❶. The list shows each member’s role ❷ and permissions ❸ (for a chatter: the creators assigned to them).
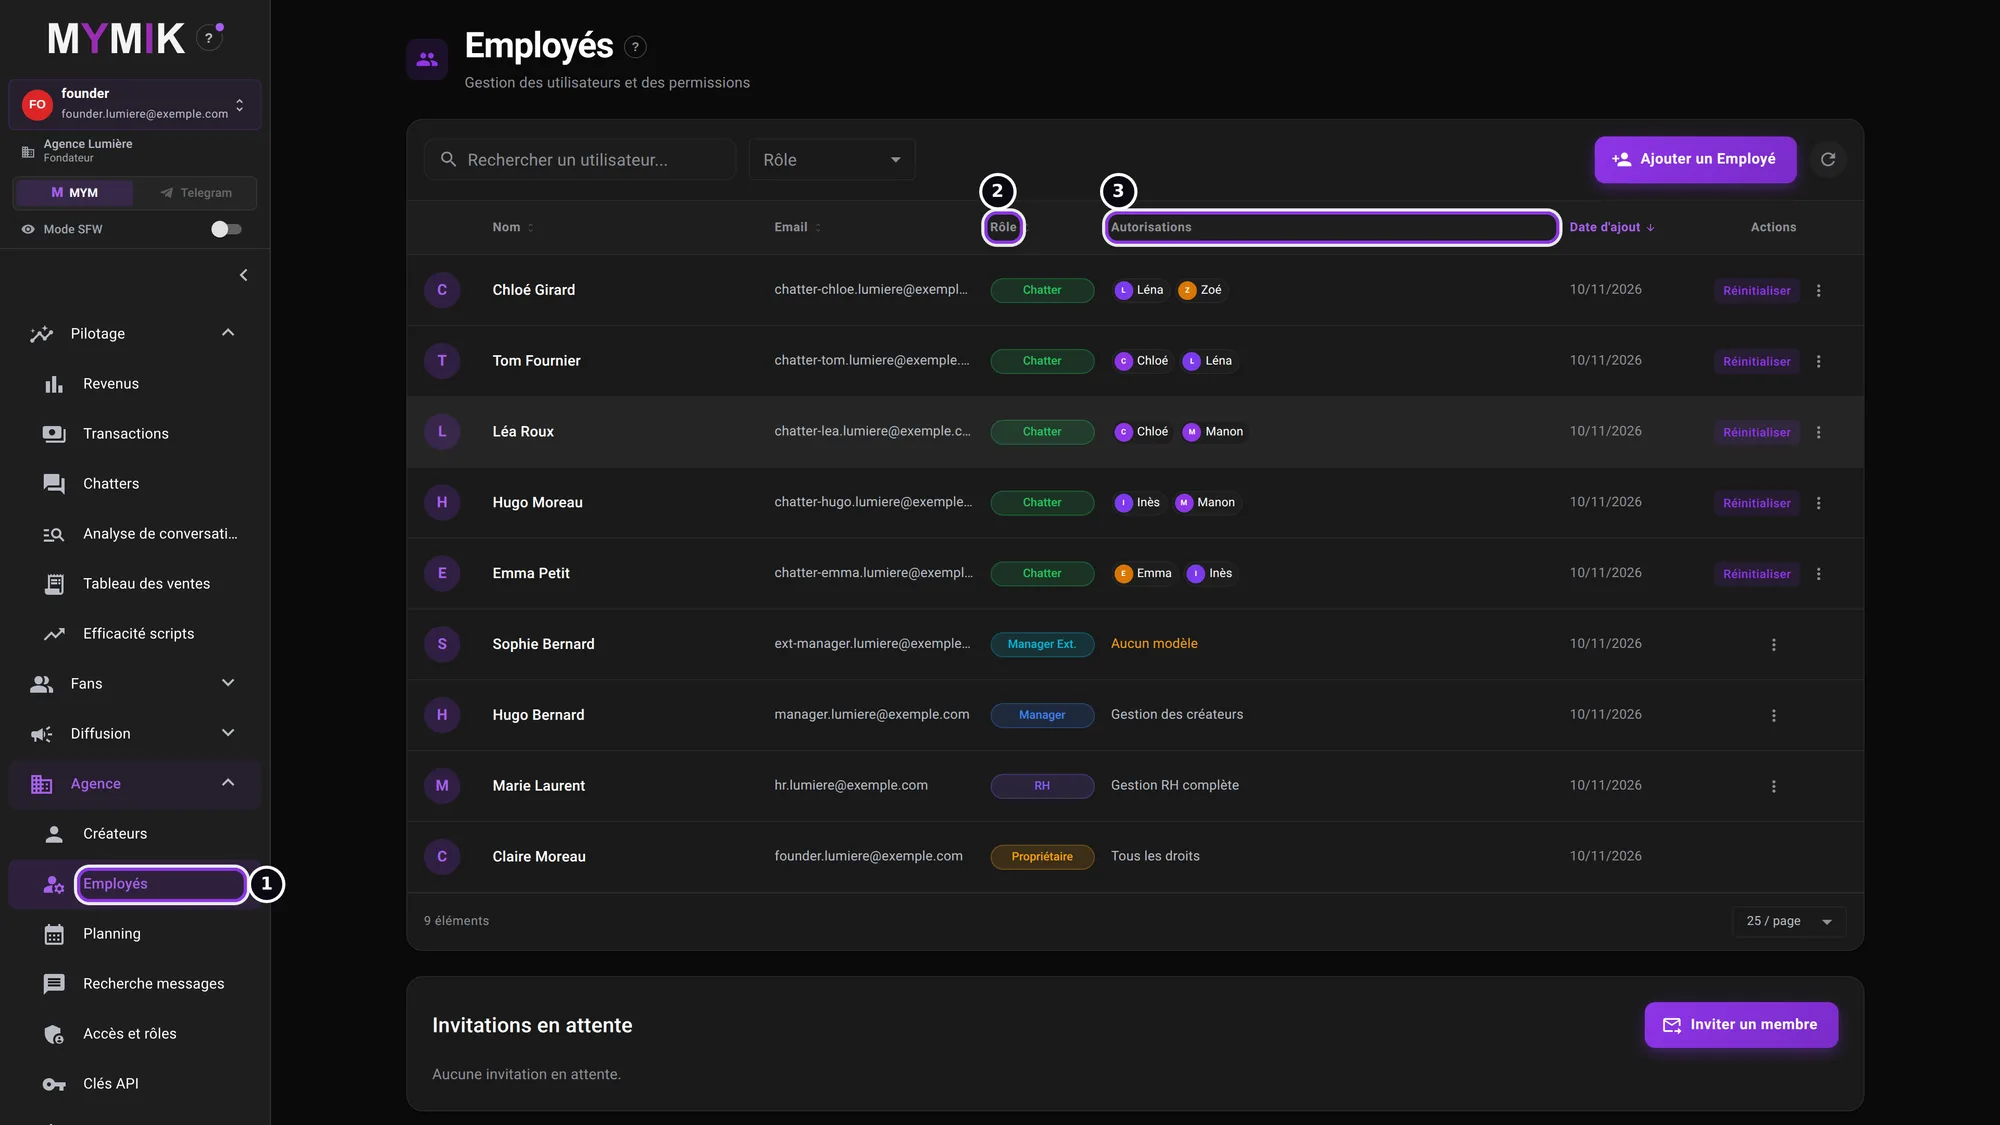 The employee list of the fictional agency: made-up names and addresses.
2. Click « Inviter un membre »
Under the list, the Invitations en attente (“Pending invitations”) area ❶ keeps track of the invitations sent: « expire dans N j » (expires in N days), « lien expiré » (link expired), Renvoyer (send again), or cancel (the link stops working). Click Inviter un membre ❷.
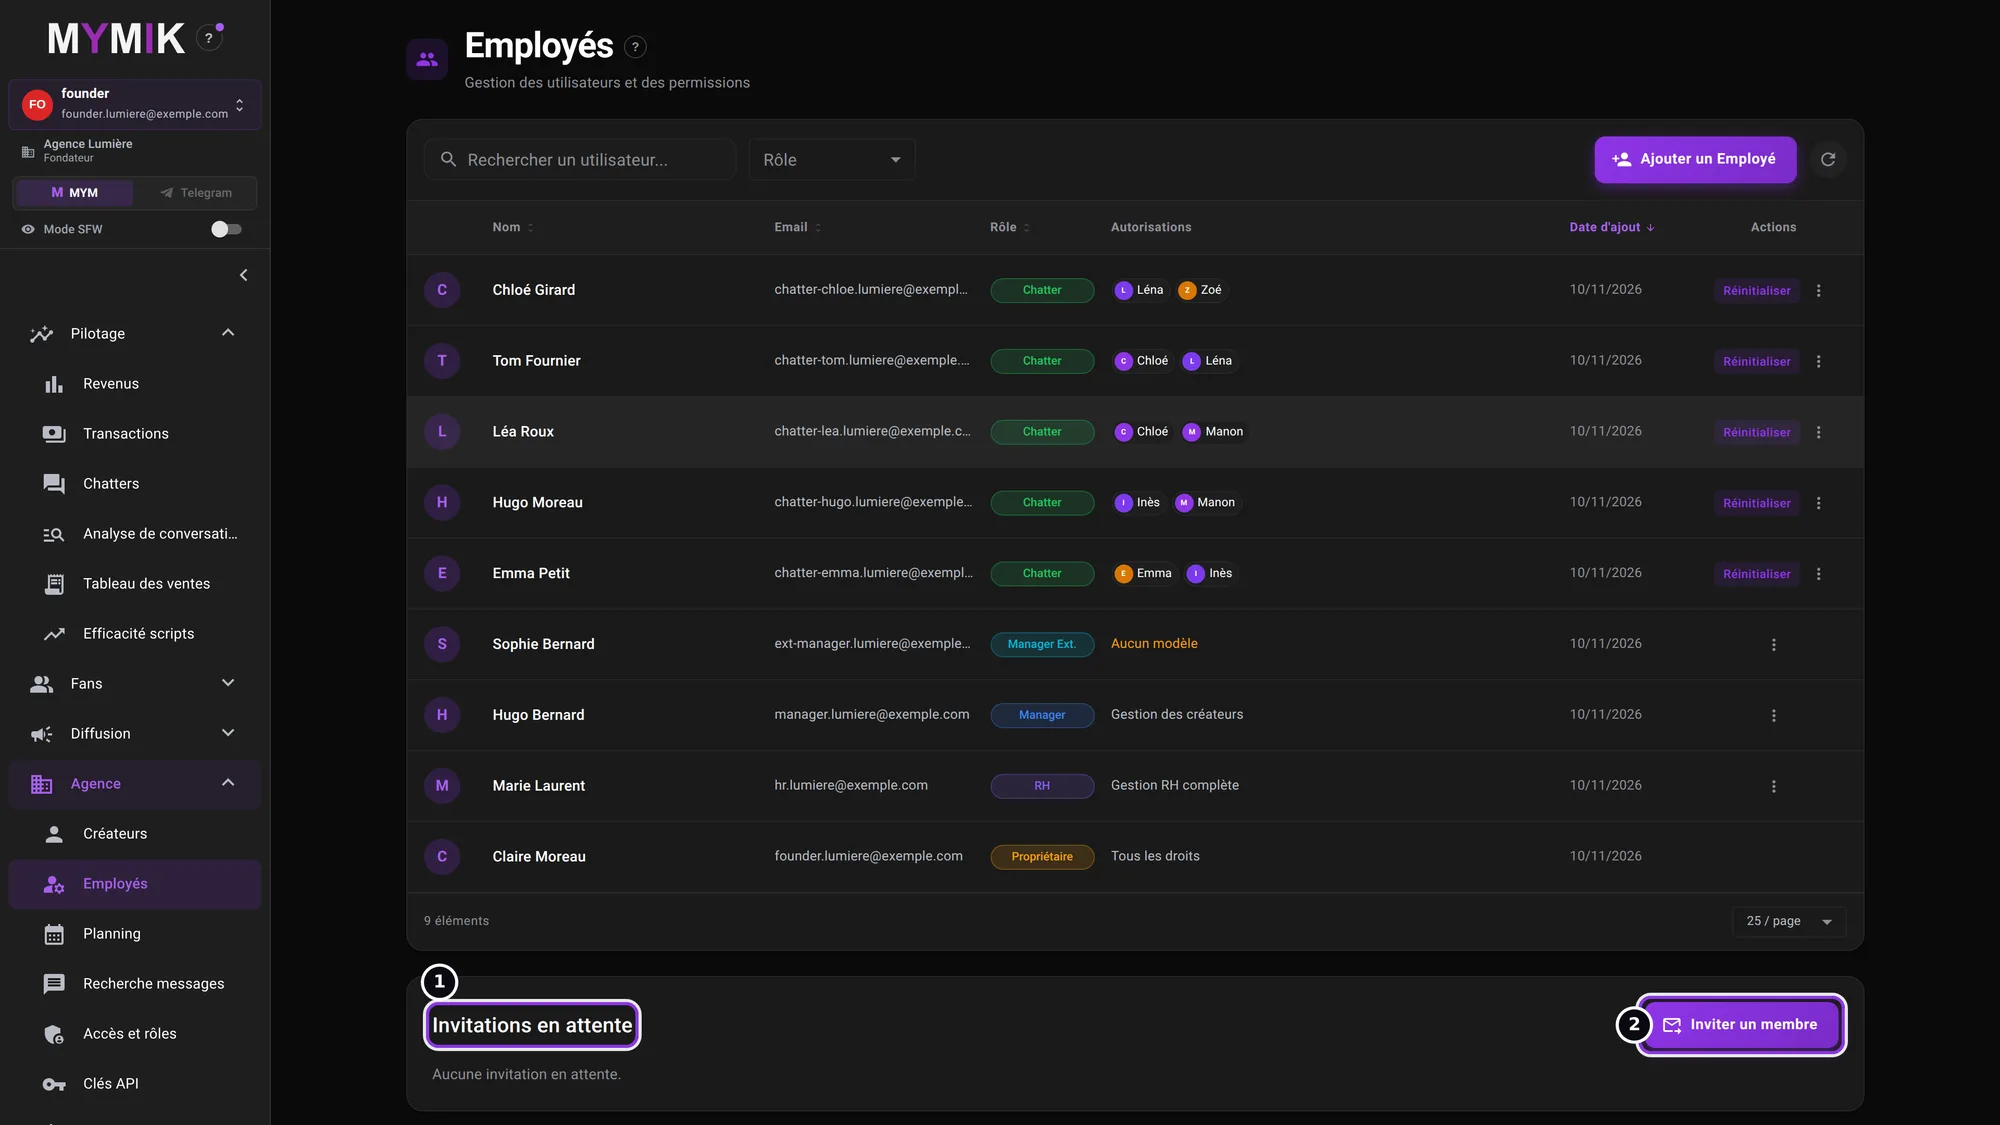 No pending invitation for now.
3. Fill in the e-mail, the nickname and the creators
Enter the person’s e-mail ❶ and nickname (« Pseudo ») ❷: it is the name the team sees in the chat, and also their sign-in name (letters, digits, “_”, “.” or “-”). Then tick the creators concerned (« Créatrices concernées ») ❸: a chatter sees only those, a manager sees them all.
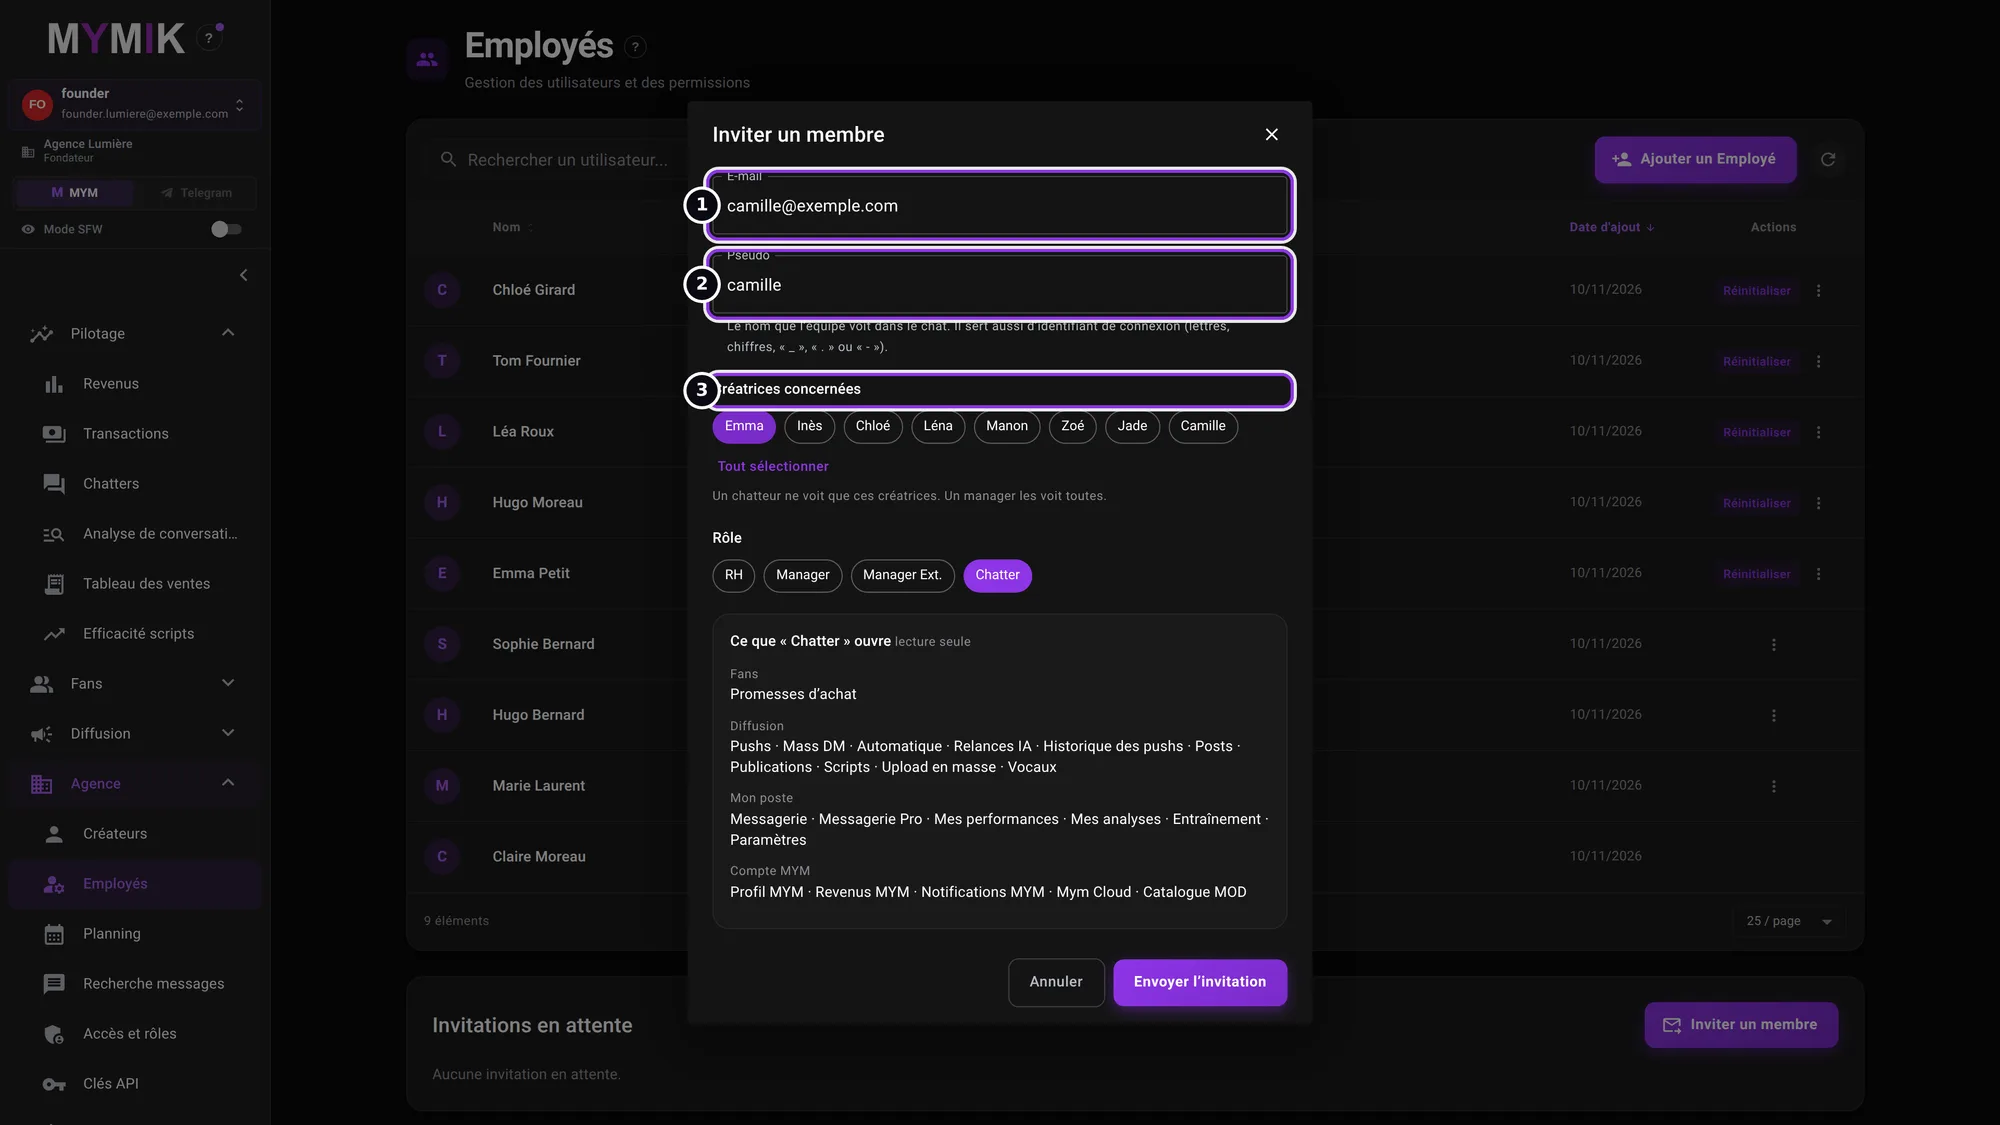 The « Inviter un membre » window (made-up address; nothing is sent for this screenshot).
4. Choose the role, then « Envoyer l’invitation »
Choose the role ❶: RH, Manager, Manager Ext. or Chatter (depending on yours). The « Ce que « … » ouvre » (“What « … » opens”) box ❷ lists, before sending, the pages this role can open. Then click Envoyer l’invitation (“Send the invitation”) ❸: the person receives an e-mail link to set up their access.
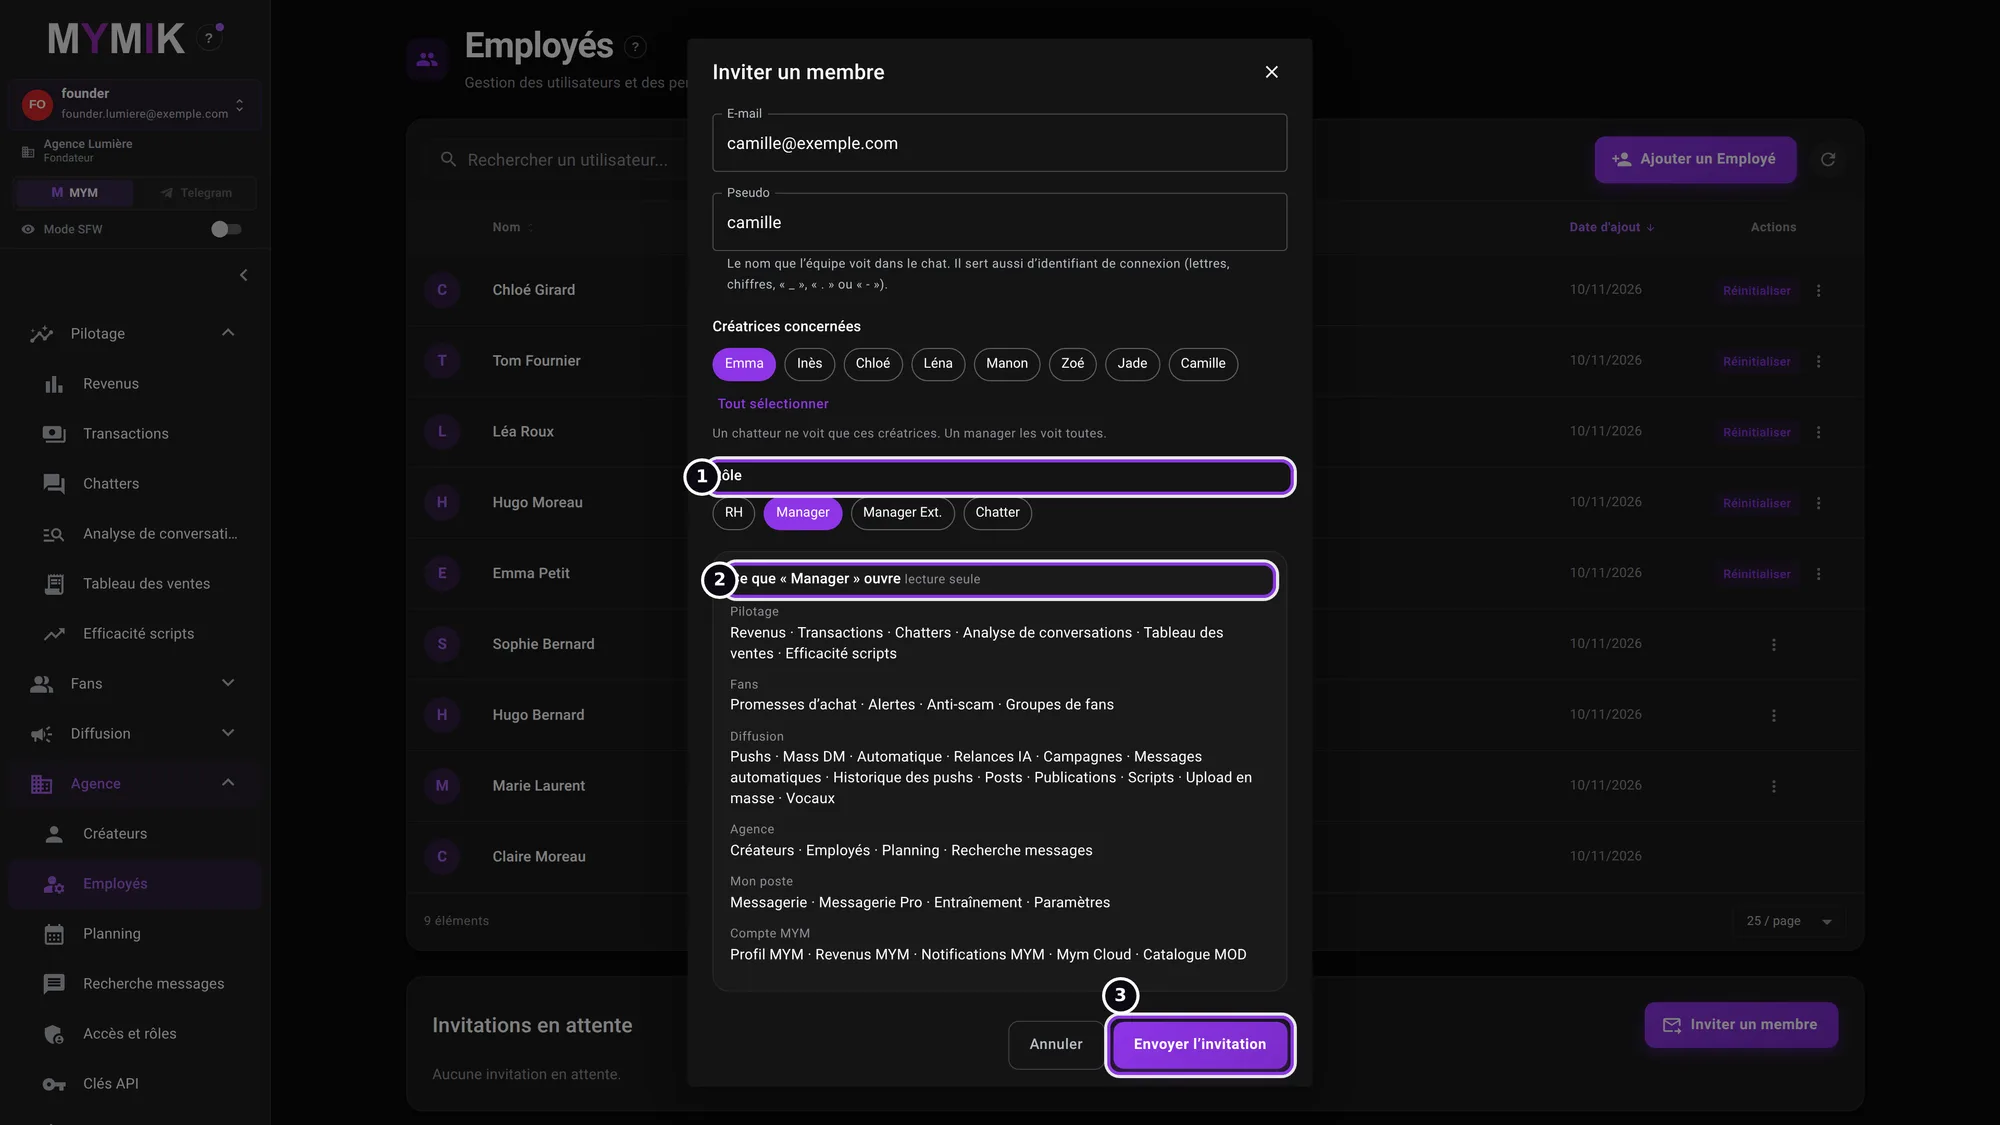 Here, the « Manager » role: the box lists what it opens.
5. Or create the account yourself: « Ajouter un Employé »
At the top of the list, Ajouter un Employé (“Add an employee”) asks for the first name ❶, the last name, the role, the e-mail ❷ and a password ❸ of at least 12 characters. Give them this e-mail and password: that is how they sign in. An e-mail already in use is refused. Prefer the invitation, which avoids passing on a password.
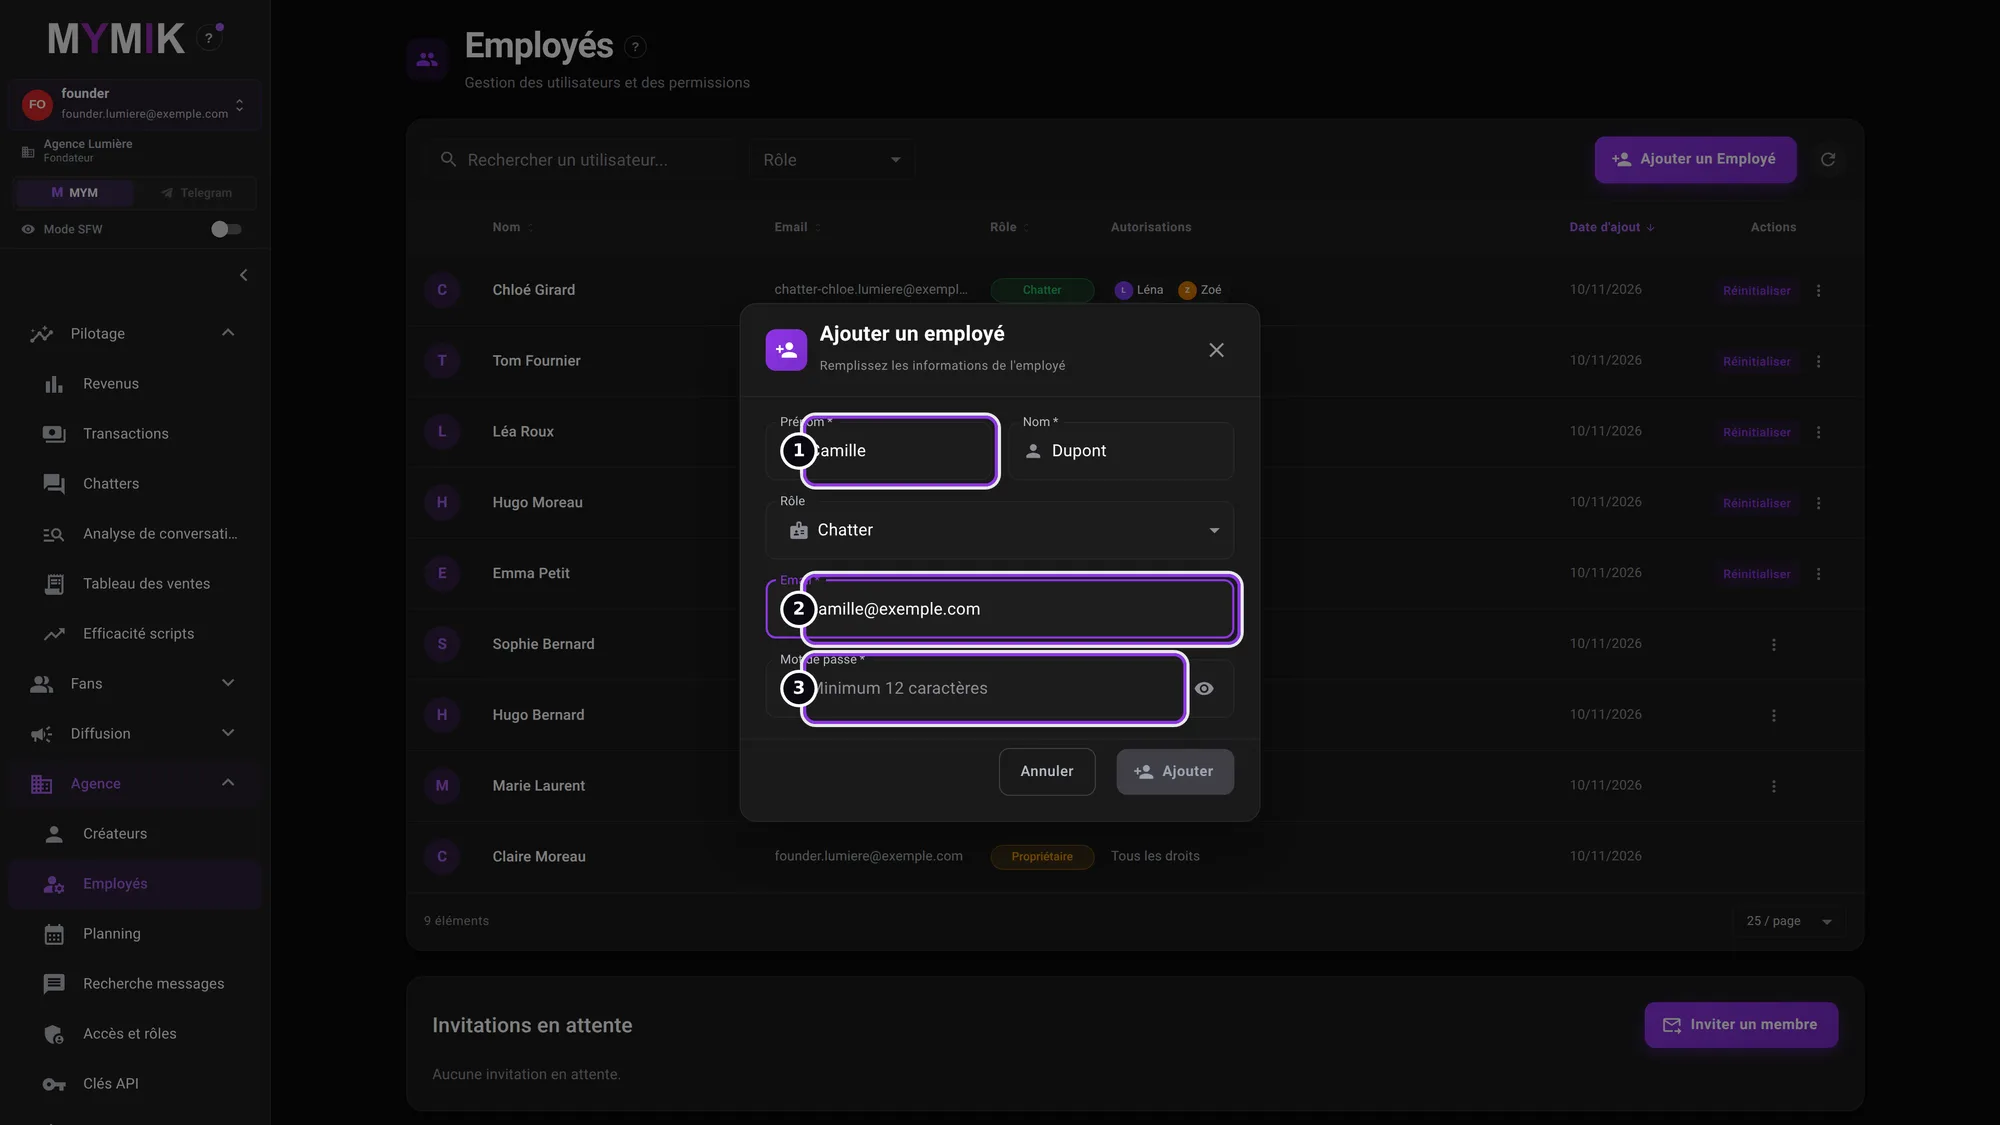 The direct-creation form (made-up values; the password is left empty).
2. Assign creators and act for a member
The « Actions » menu on each row.
1. Open the « Actions » menu of a row
Click the three dots on the member’s row. The menu offers only what you may do to them: Modifier l’utilisateur (edit), Modifier le mot de passe (change password), Gérer les modèles assignés (manage assigned models) ❶ (chatter or external manager only), Se connecter en tant que (sign in as) ❷, Supprimer l’utilisateur (delete). A missing action is not allowed for your role.
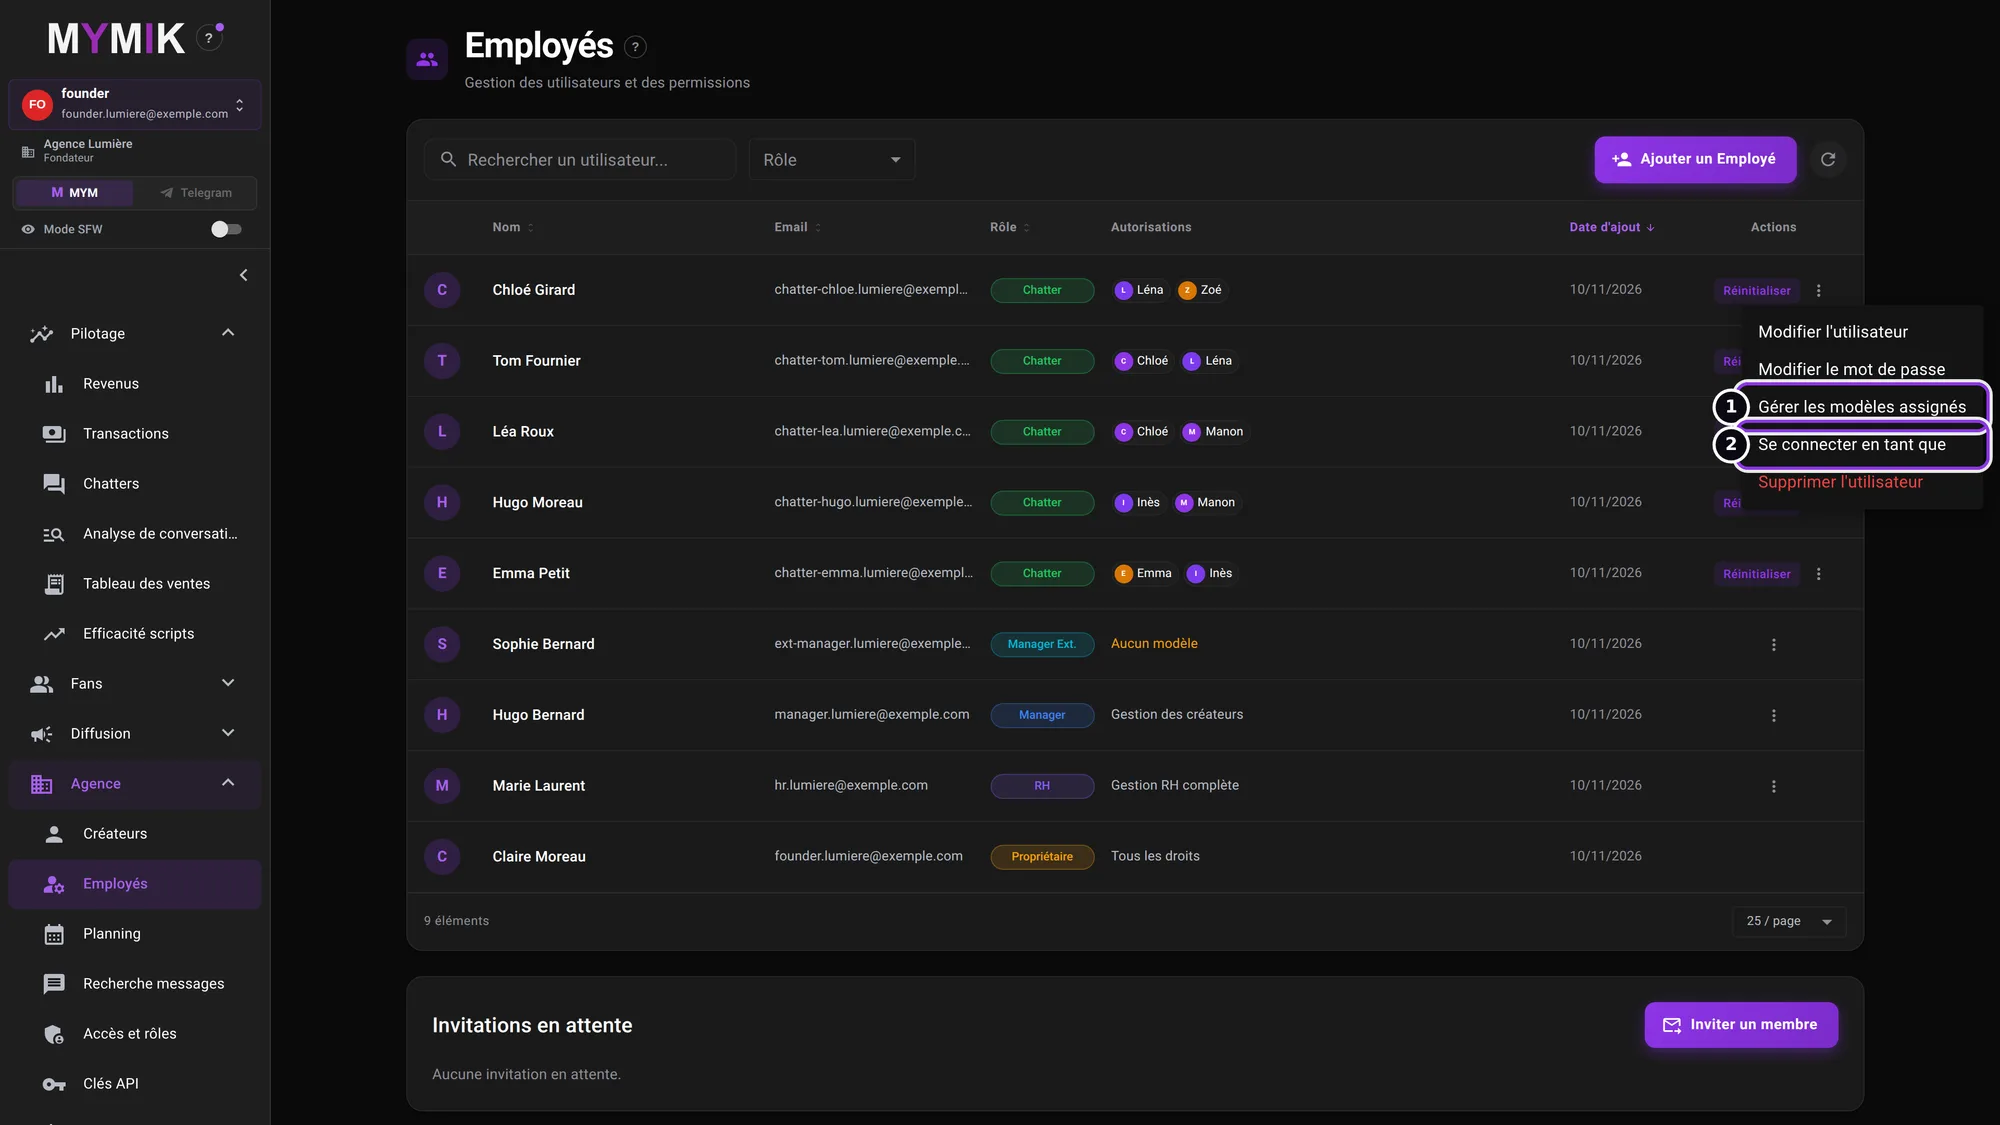 The « Actions » menu on a chatter’s row.
2. Tick the chatter’s creators
In Modèles assignés (“Assigned models”) ❶, each box is saved as you click; Confirmer only closes the window. Retirer tous (“Remove all”) removes only the creators of the space shown (MYM, Telegram or Uncove): switch space for the others.
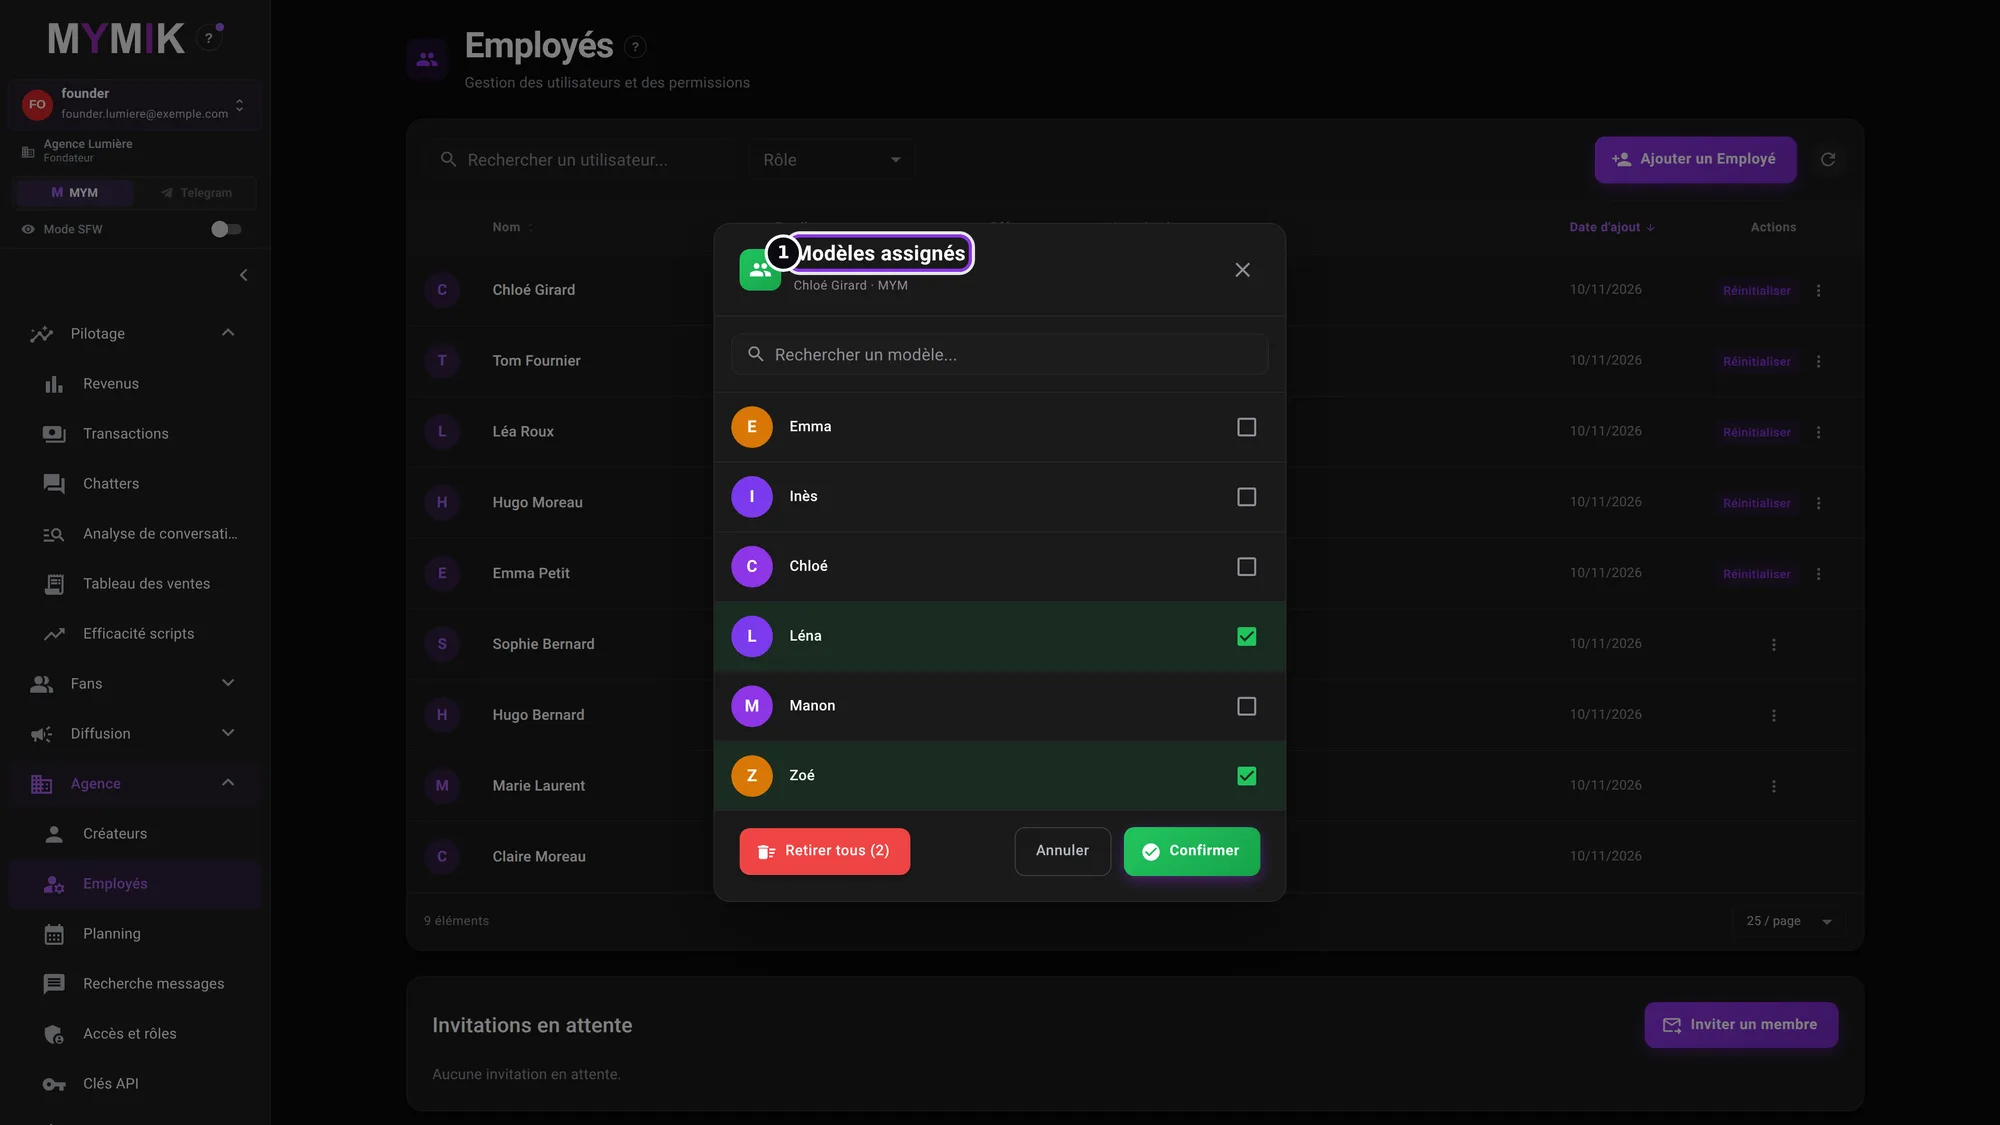 Two creators ticked for this (fictional) chatter.
3. « Se connecter en tant que »: see what a member sees
From Actions › Se connecter en tant que, the window ❶ warns you: you act as this account for 30 minutes, except for the password, accounts, roles and permissions; the sign-in and your actions are recorded in the Journal d’activité (activity log). Click Se connecter (“Sign in”). By default only the owner has this entry, and only towards a lower-ranked account.
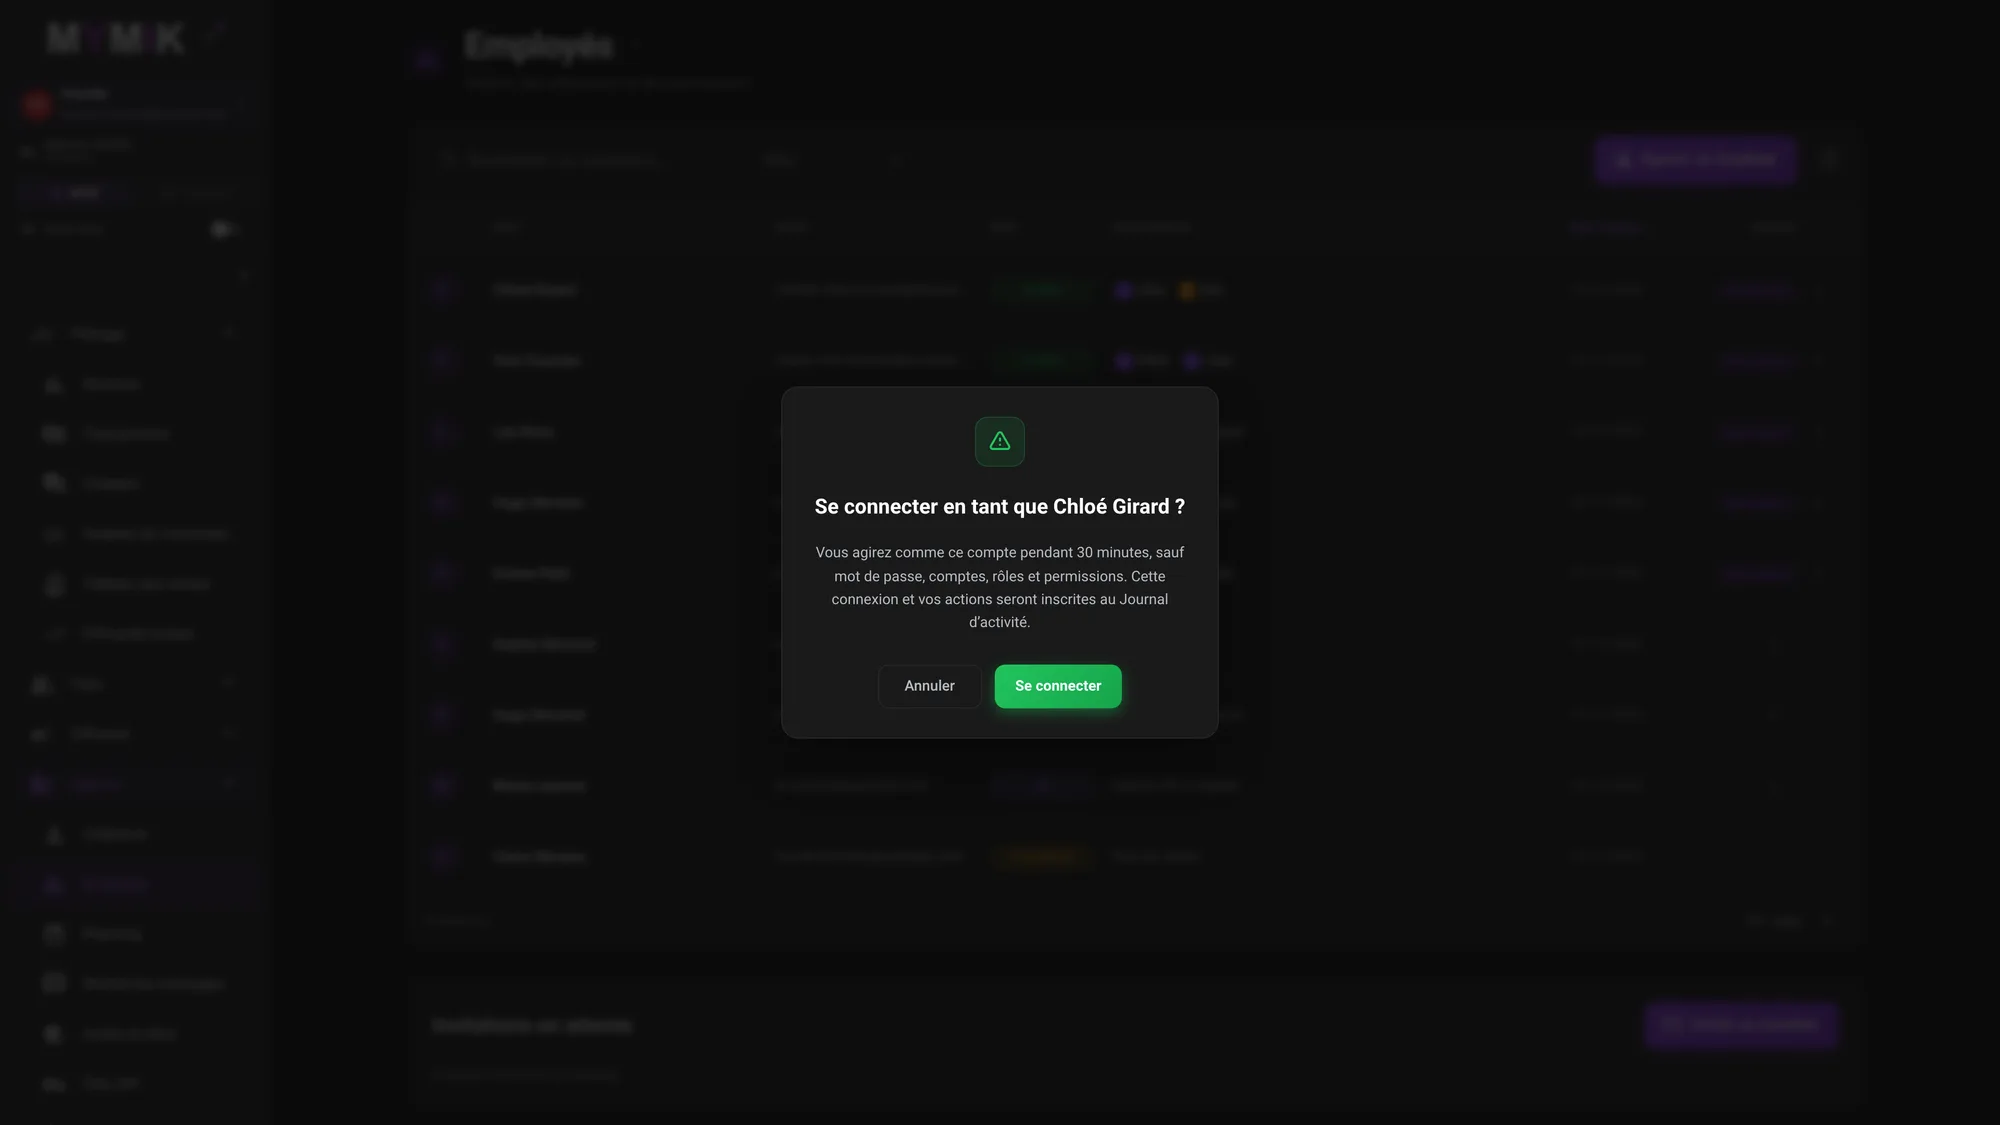 The confirmation window.
4. The banner at the top, then « Revenir à mon compte »
During the session, a banner ❶ shows « Vous êtes connecté en tant que … » (“You are signed in as …”) and the time left. You see exactly that member’s menus and creators. Click Revenir à mon compte (“Back to my account”) ❷ as soon as you are done.
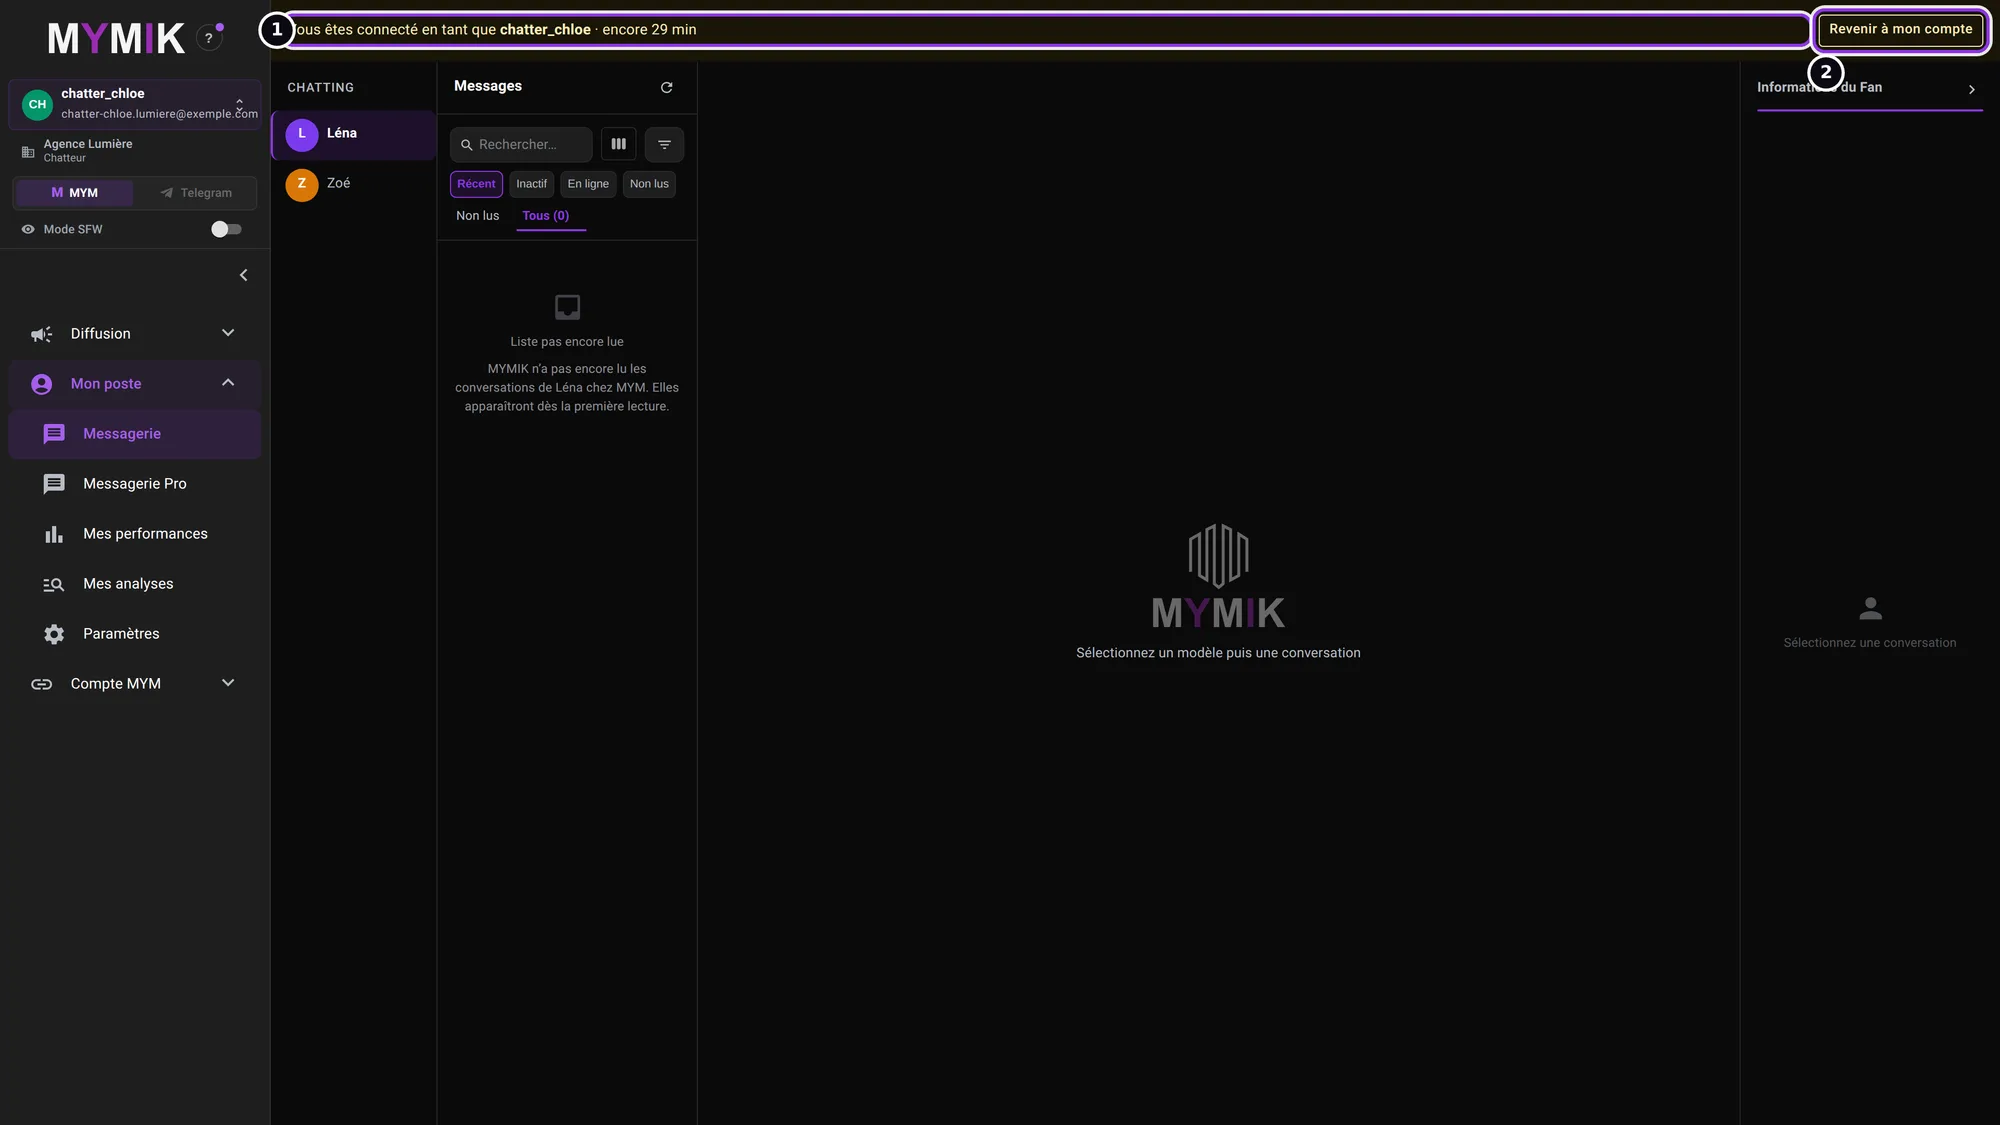 A chatter’s view: only their menus and their creators.
3. Set rights and follow activity
For the owner and HR.
1. Agence › Accès et rôles: modules and matrix
At the top, Fonctionnalités (“Features”) ❷: a module switched off disappears for the whole agency, whatever the role. Below, the permissions matrix sets, page by page and role by role, who can open what. Créer un rôle (“Create a role”) ❶ opens the next step.
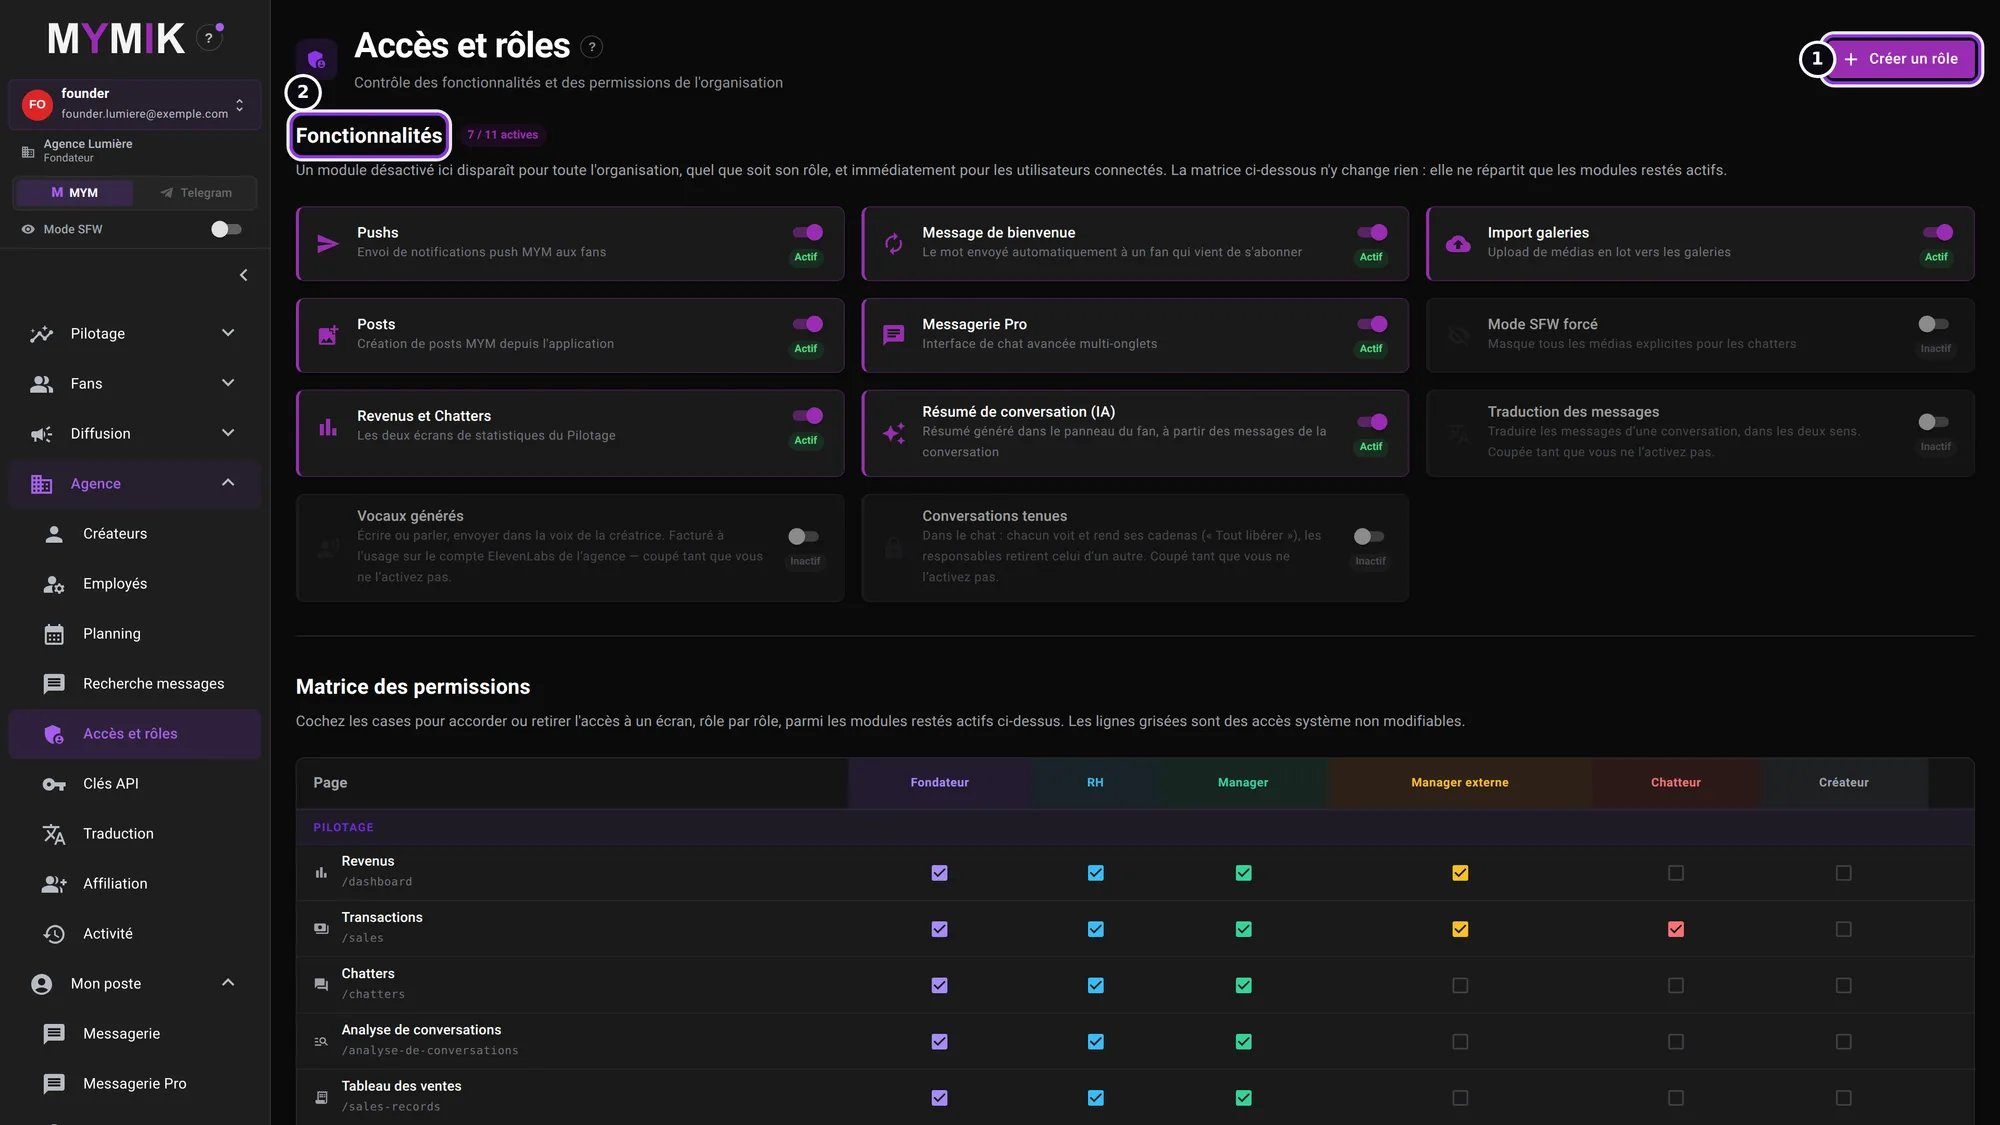 The agency’s features and the start of the matrix.
2. Create a custom role
Give a name (40 characters at most), a column colour and a base role ❶: the new role keeps its place in the hierarchy and is offered when adding someone only if you can already assign that base role. The boxes are then set in the matrix.
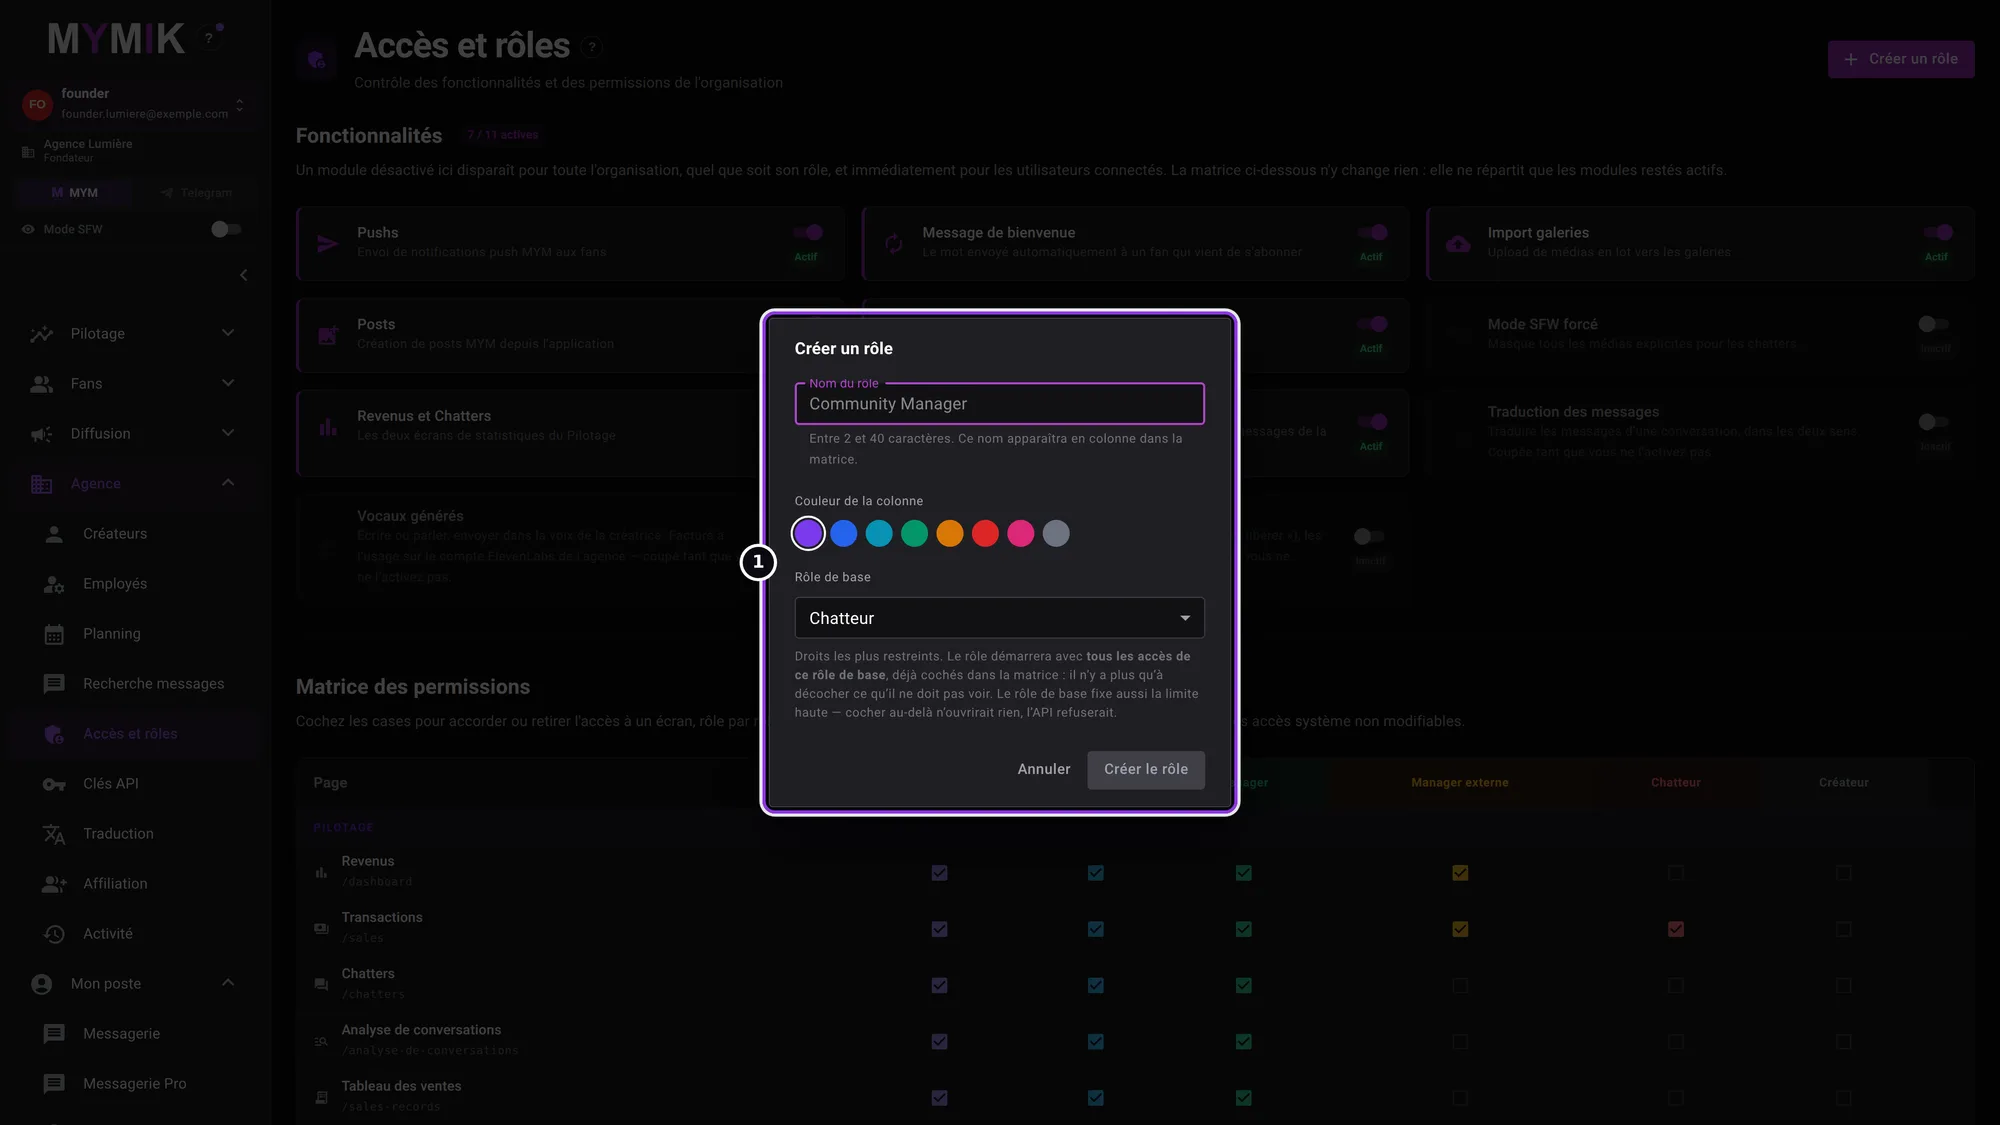 The « Créer un rôle » window (nothing is created for this screenshot).
3. Agence › Activité: who did what
The page ❶ lists each member’s actions: messages sent, screens opened, PPVs offered, sign-ins. Filter by period, creator, collaborateur (collaborator) ❷ or action type. By default the period covers the last few days.
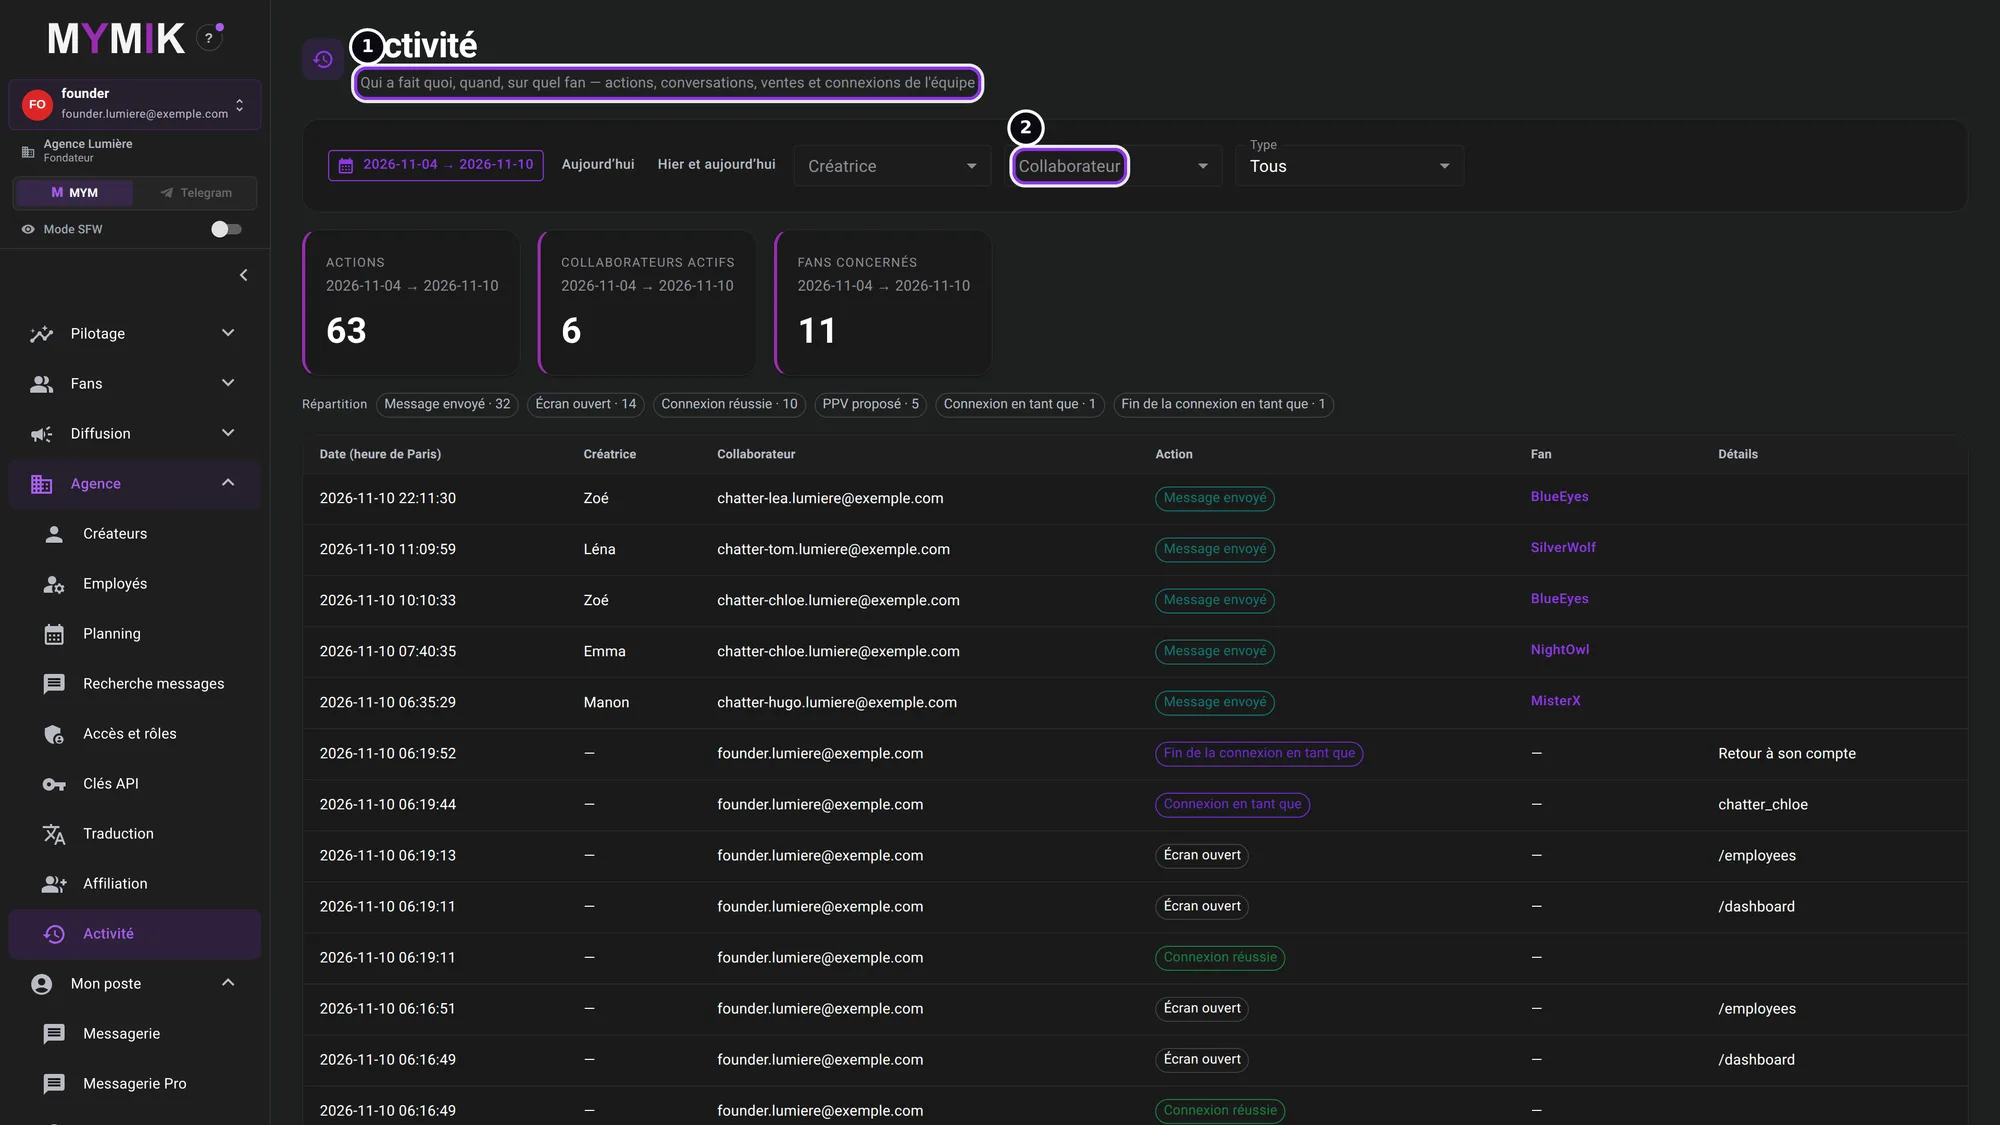 The activity log (made-up members and fans).
4. Troubleshooting
Symptom shown → cause → what to do. Quoted messages are those of the screen.
| What you see | Cause | What to do |
|---|---|---|
| No « Employés » entry in the menu | Your role is chatter or external manager. | Ask the owner or HR. |
| The role you want is not offered in the invitation | You manage only roles below your own. | Ask someone of a higher rank to invite them. |
| No « Invitations en attente » block | Invitations are not shown for your agency. | Create the account with « Ajouter un Employé », or write to us. |
| « e-mail non parti » (e-mail not sent) on an invitation | The invitation exists but the message could not be sent. | Click « Renvoyer ». If it keeps happening, write to us. |
| « lien expiré » (link expired) | The person did not open the link in time. | Click « Renvoyer ». |
| « Gérer les modèles assignés » missing | This action targets only a chatter or an external manager, and only for an owner, HR or a manager. | Check the member’s role and yours. |
| « Se connecter en tant que » missing | By default only the owner has it; the target account must also be of a lower role. | The owner can open it to other roles in « Accès et rôles ». |
| A member does not see a creator | The creator is not ticked in « Modèles assignés » (or the space shown is not the right one). | Tick it, or switch space (MYM, Telegram, Uncove). |
Still stuck?
Write to us in private at @MymikAppBot with your agency, the creator and the exact text displayed. The MYMIK team
MYMIK guide no. 8, version of 10/11/2026.
Last updated on
Guide 7 · Find and sort your fans: groups, types, search
A creator can have hundreds of fans. You find them by nickname, filter them by buyer type, sort them into groups (“VIP”, “Snap”…) and see their MYM box.
Guide 9 · Scripts: create, organise, see what goes out
A script is a series of messages (with their media and price) that the chatter sends in order. You create them once per creator, reuse them, and see which ones work.